 The Bounty Hunter QuickSilver metal detector isn’t a bad choice for beginners. There are a lot of detectors out there that are much better quality and offer more features, but you can’t beat the price of the QuickSilver. It is mainly because of the price that I would recommend this detector for beginners that are strapped for cash. You can pick this detector up new for a little over $100.00, or second hand for much less than $100.00. If you have a higher budget (a little over the $200.00 range) then I’d recommend you check out the Garrett Ace 250 or the Fisher F2.
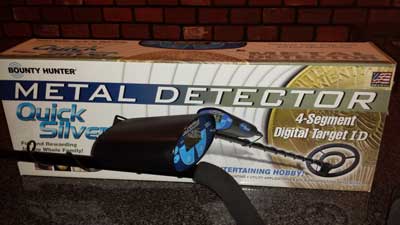
I actually got my start on the Bounty Hunter QuickSilver detector. I have upgraded since to the Garrett AT Pro, but I still have Bounty Hunter and it is pictured to the left.
After 20 years of service at the company I work for, I was allowed to choose a gift from a catalog. When I saw this metal detector it was something I had to have because I had always wanted to get into detecting, but had never wanted to spend the money on one.
This is where I think the QuickSilver is a really good choice for a beginner. For around $100.00 you can get out and start doing some detecting. You can do this without investing a lot of money, while you determine if this is a hobby that you want to really pursue further. If you do really get into this hobby, I can tell you that you will probably end up upgrading to a more robust and feature rich machine. But the QuickSilver can help you make that determination without breaking the bank.
So let’s take a closer look at the features of the Bounty Hunter QuickSilver.
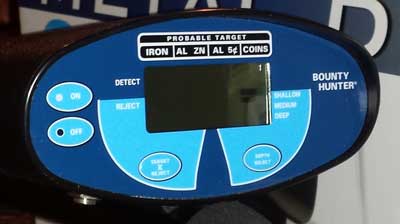 You can see the LCD display here. It has a touch pad selection control panel that is easy to use. So beginners won’t get hung up on a lot of technical features. It has the ability to detect all types of metals, and you will get a visual indication of what type of metal has been detected beneath the surface of the ground. You can also see a sensitivity setting or depth select with values of Shallow, Medium, and Deep. Lowering the sensitivity is recommended until you get used to the detector, as it helps to eliminate false signals. There are 4 notches (IRON, AL ZN, AL 5c, and COINS) that will indicate what type of metal the QuickSilver has potentially detected.
IRON – will indicate ferrous objects, metals composed mostly or entirely of iron, small foil pieces and small gold pieces. When this notch is displayed, the detector will emit an accompanying low audio tone.
AL ZN – will indicated pennies after 1982 (made with zinc), most bottle caps, older pull tabs, large foil pieces, and some rings (including gold rings). A mid-tone will be emitted when this notch is detected.
AL 5c – will indicate that the detector may have located large gold rings, newer pull tabs, nickels, or large aluminum pieces. This will also have an accompanying mid-tone when this notch is detected.
COINS – will indicate silver coins, dimes, quarters, copper pennies (minted before 1982), and very large metal objects. You will get a high tone when this notch is detected. I’m usually a coin hunter, so I love hearing these high tones.
I recorded some samples of these tones and you can hear them here.
 The QuickSilver is light weight, which makes it great for all day use. It weighs in at only 2.8 pounds.
It has a padded arm rest that you can attach an optional strap to if you wish. This really isn’t needed though. On the back side of the arm rest is a stand that allows you to set the detector on the ground without falling over. It also has a cushioned hand grip for comfort.
The upper and lower stems connect easily, and you can adjust the length of the detector easily with the silver button.
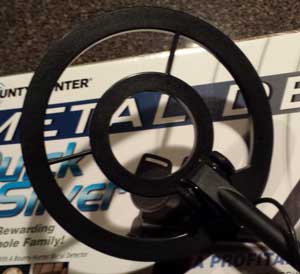 This Bounty Hunter comes with an 8 inch open face search coil. The search coil is waterproof, but the detector electronics are not. So you can submerge the search coil in shallow water as you detect around creeks or streams. Just be sure to not get the electronics in the control box wet.
The cable from the search coil wraps around the shaft and plugs easily into the control box.
The detector body also has an external speaker as well as a 1/4 inch headphone jack, should you decide to use headphones with this model.
The battery compartment is easily accessible on the bottom of the control box. The QuickSilver is powered by two 9 volt batteries. There is a low battery indicator on the LCD display that will be displayed when the power in these batteries starts to run low.
When you start using this detector, I recommend doing a “bench test”. This will help to familiarize yourself with the types of tones and indicators that the detector will give you when certain objects are detected. To do a bench test, you will need things like a nail, coins (old and new pennies, nickel, dime, quarter), and maybe a silver and gold ring. With the detector positioned away from any other metal objects, you can power it on and then pass each of these objects under the search coil. You can then see what type of signal and indicators each of these objects presents to you when the detector sees them. This will help you to learn what may lie beneath the surface when you are actually out detecting.
I mentioned notch discrimination earlier. This is a very easy feature to use that can help make your detecting experience more pleasant. If you are searching for coins for example, you may not want to be bothered with all of the iron or ferrous signals from nails and other objects that are detected beneath the surface. When an iron signal is detected, you can simply press the Target Reject button. This will place an “X” beneath the Iron indicator. From this point on, you will not be alerted of any iron objects that are detected. This cuts down the chatter and just allows you to be alerted for the signals that you are interested in.
One of the most important things you must do with any metal detector is get to know it. Spend some time practicing and dig all signals for the first 10 or 20 hours that you are out detecting. This will help you to learn ‘what your detector is trying to tell you’ as it presents different signals to you.
Metal detecting is a great hobby that I really love. I can’t spend enough time doing it. I got my start on this Bounty Hunter QuickSilver and still own this detector today. I use the Garrett AT Pro as my primary detector now, but have kept this QuickSilver as a backup, and to lend to other people that I may take detecting with me for the first time.
This detector is a good option for beginners because of the low price point. It offers an inexpensive way to determine if this is a hobby that you will want to continue to pursue yourself or not.
Here are a couple of buying options for both new and used Bounty Hunter QuickSilver metal detectors:
[easyazon_block add_to_cart=”default” align=”left” asin=”B0002JZMXY” cloaking=”default” layout=”top” localization=”default” locale=”US” nofollow=”default” new_window=”default” tag=”thedirtfisher-20″]
Used Bounty Hunter QuickSilver Detectors on eBay